Build a Squarpent: Redefining the Shape


Concept
Initial
Jigs
Testing
Receiver
Assembly
Holes
Complete


In order to reshape the instrument to a form convenient for playing, some 'bends' will need to be made in the tube. The Squarpent uses a shape similar to a baritone saxophone, requiring only five cuts to make the bends.

Refer to the downloadable documents for detailed information on where to make the cuts.

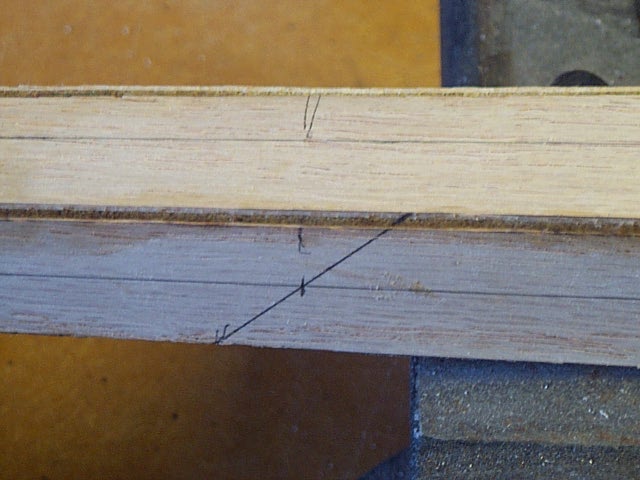
Measuring along the bore centerline from the mouthpiece end of the tube, mark the five cut locations. Then, using an accurate angle or square, draw guide lines as shown in the photos. On the plane of each cut, the line will be at 45 degrees relative to the centerline (NOT relative to the side of the tube!)

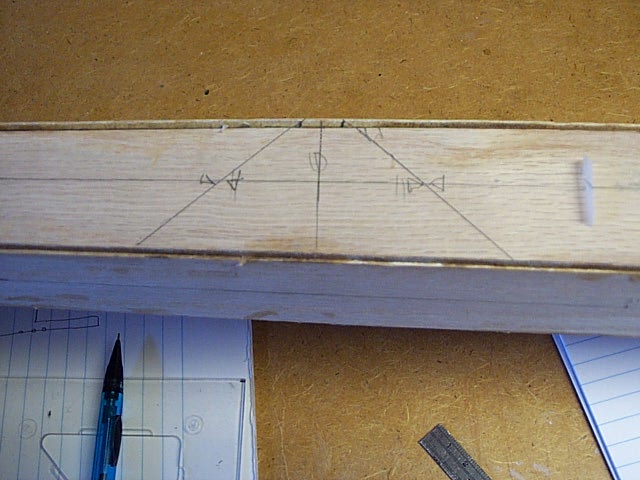
Not shown in the photo are the extensions of the cut lines. Once the saw has been started on the diagonal cut line, it will be useful to have guide lines on the two adjacent sides of the tube to help keep the saw straight. These lines will be at 90 degrees to the centerlines, and will match the ends of the first (diagonal) cut line. The fourth side of the tube will not need a line.

This photo shows the first cut (Cut A) nearest to the small, or mouthpiece, end of the tube.


This photo shows the next two cuts, at locations 'Cut B' and 'Cut C'. Notice how there is some space between the cuts where they come closest to each other. This will result in a similar sized space between parallel sections of tube after the bends have been made.

Without this space, the overall assembly of the tubing sections in subsequent steps might be easier, but it will be more difficult to get a good mechanical joint on the inside of the bend, gluing will be more difficult, and there will be more likelihood of a leak in this area.


This photo shows the last two cuts, at locations 'Cut D' and 'Cut E'.
 
This photo shows how the adjacent sections of tubing will come together after making the diagonal cuts. The small section between the cuts has been rotated 180 degrees, which causes it to end up at a 90 degree angle relative to its original position.

Test fit all such sections, and sand the ends of the cut wood to remove burrs.

During test fitting, it will be apparent that the small sections no longer line up precisely with the larger sections on either side.This is because when a diagonal cut is made on a tapered tube, the width of the tube section at one end of the cut is wider than the width at the other end. When the section is rotated, the smaller side is now aligned with a larger dimension on the adjacent tube section. However, the difference is quite small, and the slight irregularity in the tube cross-section at the joint has negligible effect.

This photo shows all sections after the cuts have been made.

The next step will be to assemble the sections into the final shape.


All photos made using a Kodak DC240 digital camera.


Go to next chapter


The Serpent Website: Return to Index

Copyright Paul Schmidt 2002
added August 2002